Sysadmin

pf.anchor

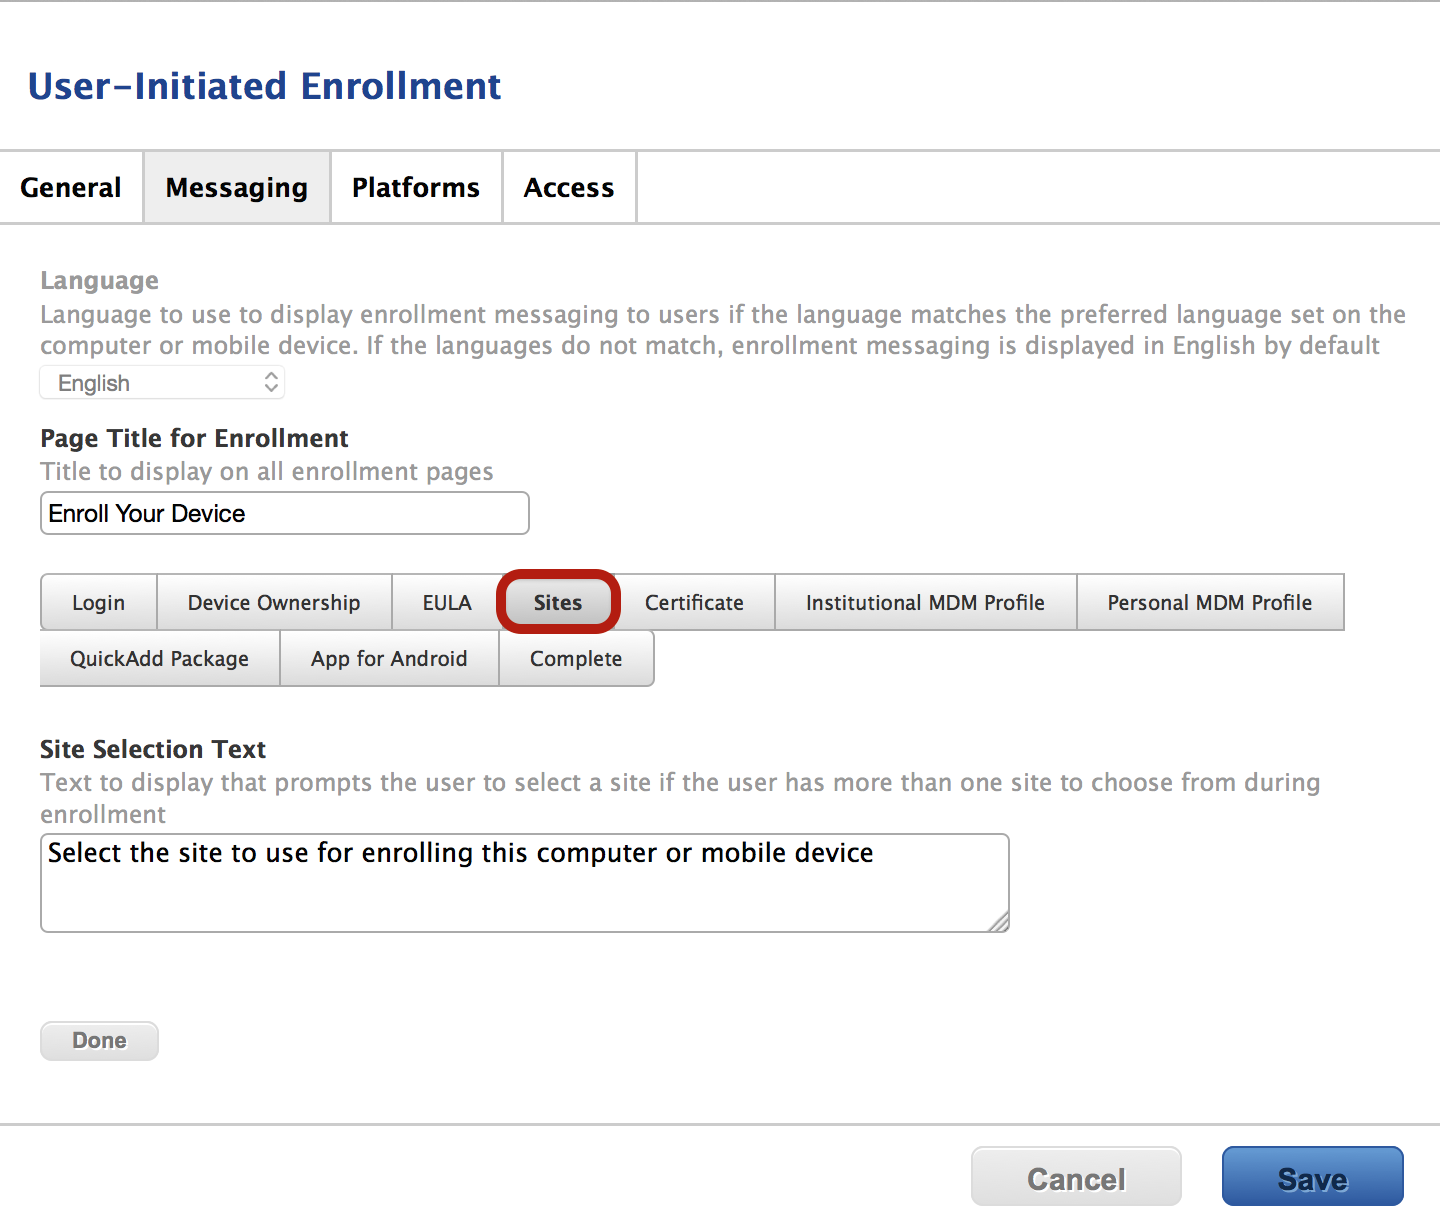
I have started to talk a bit more about PF in a broad sense. Over the course of my talks or general discussion it has been brought to my attention that people would like to see a sample pf.anchor. Well I have posted on my github a sample of pf.anchor.

Please not that when you place the file inside of pf.anchor you will do some following items in order for it to be successful

  1. Create a com.yourcompany within the pf.anchors folder
  2. Ensure the pf.conf file is set to read all the anchors within pf.anchors
  3. TEST

Here are the samples of both the pf.conf and pf.anchor files along with the link to Github. Happy Trails
#Default PF configuration file.
#

# This file contains the main ruleset, which gets automatically loaded
# at startup.  PF will not be automatically enabled, however.  Instead,
# each component which utilizes PF is responsible for enabling and disabling
# PF via -E and -X as documented in pfctl(8).  That will ensure that PF
# is disabled only when the last enable reference is released.
#
# Care must be taken to ensure that the main ruleset does not get flushed,
# as the nested anchors rely on the anchor point defined here. In addition,
# to the anchors loaded by this file, some system services would dynamically 
# insert anchors into the main ruleset. These anchors will be added only when
# the system service is used and would removed on termination of the service.
#
# See pf.conf(5) for syntax.
#
#
# com.apple anchor point
#
scrub-anchor "com.apple/*"
nat-anchor "com.apple/*"
rdr-anchor "com.apple/*"
dummynet-anchor "com.apple/*"
anchor "com.apple/*"
load anchor "com.apple" from "/etc/pf.anchors/com.apple"

scrub-anchor "com.jason"
nat-anchor "com.jason"
rdr-anchor "com.jason"
dummynet-anchor "com.jason"
anchor "com.jason"
load anchor "com.jason" from "/etc/pf.anchors/com.jason"

This is the beginning of the pf.anchor file, which is read by pf.conf

#Macros
tcp_services = "{ rfb }"
casper_ssh = "{ ssh }"
casper_filerep = "{ 443 }"
casper_comms = "{ 8443 }"
udp_services = "{ rfb }"
icmp_types = "{ echorep, echoreq, timex, unreach }"

#Tables
#list out hosts to allow for whitelisting of "our" services

#table <block_hosts> persist
#table <dont_log_block_host> persist
#table <private> const { 10/8 172.16/12 192.168/16 224/8 }
#table <martians> const { 127/8 10/8 172.16/12 192.168/16 169.254/16 240/4 0/8 192.2.0.2/24 }

#Cyber Security Scanners
#table <whitelist_host> persist { \
        129.8.64.0/24 \
        150.342.46.291/27 \
#}

#Your Services
#table <yourhosts> persist { 821.6.14.24 123.4.5.987 198.33.45.11 128.4.98.103 198.7.128.193 100.3.28.14}
#           821.6.14.24      \ #Casper Server
#        123.4.5.987      \ #Bigfix production service
#        198.33.45.11        \ #Test server for Casper infrastructure
#        128.4.98.103       \ #jFuture management server
#        198.7.128.193       \ #Casper Software Repo
#        100.3.28.141       \ #Future management server

#table <bigfix> persist { 123.4.5.987  }

#these are added in if we need to allow SSH via OTP on a client device. 
#table <otp> const { 281.4.56.43 }      

#ssh.server.corp = 113.56.78.987
#otp.example.corp = 281.4.56.43

#Rules Created by "You"

#disable all filtering on loopback, possible Vmware nets
set skip on {lo,vmnet}

#block all inbound traffic
block in log all

#allow out the tcp and udp traffic
#pass in log proto tcp from <yourhosts> to port $tcp_services 
#pass in log proto udp from <yourhosts> to port $udp_services
#pass in log proto udp from <bigfix> to port $bigfix_udp 
#pass in log quick proto tcp from <otp> to port $casper_ssh
#pass in log quick proto udp from <otp> to port $casper_ssh
#pass in log proto tcp from <yourhosts> to port $casper_ssh
#pass in log proto udp from <yourhosts> to port $casper_ssh
#pass in log proto tcp from any to port $casper_comms
#pass in log proto tcp from <yourhosts> to port $casper_filerep

#Allow whitelist hosts
#pass in log from <whitelist_host> to any

#Allow Your Service hosts
#pass in log from <yourhosts> to any

#Allow control traffic from LBL router
#pass in proto igmp from router_ip_here allow-opts

#ICMP traffic allowed to be passed in
pass in log inet proto icmp icmp-type $icmp_types
#We specified the address family 'inet' because it is required by pf when specifing icmp type

#Trust all outbound
pass out all keep state

#James has these in his pf.conf files to do not log these, but we can take them out if necessary     
block in proto { tcp, udp } to port { 137:139, 17500 }
block in proto { tcp, udp } to port 631 #ipp - printers

Deploying a EULA with the Casper Suite

Recently I spoke at the JAMF Road Show in San Francisco on the basics of the Casper Suite. During this talk I reviewed OS X and iOS management of the Casper Suite. I described the different ways an organization can utilize the suite to accomplish their goals and give their admins their weekends and time back. I also discussed how we are having users sign a EULA and why we had not figured out how to deploy the EULA with Casper. Because I am working on deploying a couple hundred iPads within my fleet, I needed to determine a way to deploy a EULA with Casper. After digging around the JSS (Jamf Software Server) I found out how to deploy a custom EULA with the Casper Suite. The web interface does not blatantly tell you how to customize the EULA, but it does hint that it can be done. I will now describe how to locate and modify the enrollment page, which will support a custom EULA.  

First, login to your JSS and navigate to the settings tab, which is the blue gear in the upper right hand corner. Once there click on:

  1. Global Management
    then
  2. User-Initiated Enrollment

Where is the Eula?

The first screen the admin will see is the User-initiated Enrollment. This will provide four options:

  • General
  • Messaging
  • Platforms
  • Access

Each section will aid the end user in enrolling your management tool. The general section contains the following:

  • Restrict re enrollment
  • Skip certificate installation during enrollment

In order to create a customize EULA, click on the second tab labeled Messaging. 

Four tabs to rule them all

Once you select the Messaging tab, you will be presented with the Language box that says English. The view button is the key to deploying a customized EULA and enrollment environment. 

Eula, enrollment text, and more oh my!

The first option you have to customize the enrollment title page, Page Title for Enrollment.

https://yourjss.com:8443/enroll

There are ten categories:

  • Login
  • Device Ownership
  • EULA
  • Sites
  • Certificate
  • Institutional MDM Profile
  • Personal MDM Profile
  • QuickAdd Package
  • App for Android
  • Complete

Login lets you customize everything on the login page:

  • Login Page Text
  • Username Text
  • Password Text
  • Login Button Text

Login Page

The next tab is the Device Ownership. This page will help the user determine what type of device they will be enrolling.  This will also determine the level of control you will have as the administrator.

Device Ownership

The next tab is why we are all here today. FINALLY THE EULA. This section is where you can add your customized text from your legal or IT departments. The EULA terms will vary depending on if the device is personally or institutionally owned. If this was the only section you needed then you can skip the rest of the post; however, there are more options you can customize.

Ladies and Gentleman the main event, the EULA. 

The next three slides allow you to customize:

  • Sites
  • Certificate
  • Institutional MDM Profile
  • Personal MDM Profile

I would not recommend changing this text as there are a lot of system defaults here that may explain the purpose of the profiles and certificates in better detail. 

The Quickadd Package tab may be a tab you want to edit if you are granting technicians or users the ability to self-enroll OS X devices. The Quickadd Package Installation Text has the default text

Download and install this package

It wouldn't hurt to potentially add a bit more context about the installation package. Downloading and installing this package is great; however, the message could also read

Download and install this package that will grant access to the VPN, Wifi, and E-mail.

VPN, WiFi, and Email tend be the sticking points for a lot of people so what better way to draw people in than to tell them they can gain access to all this by installing one package?

OS X Customization

If you plan on deploying Android devices with the Casper Suite then there is a section that allows you to customize that text.

Droids

The last customizable portion of this section is the completion page. You can edit successful and failed installation messages. Instead of the standard contact for your administrator you can direct them to call the help desk or open a ticket. 

Game over

The last two tabs are:

  • Platforms
  • Access

The Platforms tab allows you to select what kind of devices can be enrolled with user-initiated enrollment. If you would like to allow enrollment of OS X, iOS, or Android devices then ensure you check all the correct boxes.

The Access tab allows certain or all LDAP groups to enroll devices and determines what types of devices.

Options for platform enrollment

Deploying a customizable EULA is very easy with the Casper Suite. If your organization requires this before devices can be enrolled (whether they are institutional or personal) then it is an option. I will say that just because this option is available does not mean it is necessary. Make sure you weigh the cost and benefits of changing the verbiage when devices are enrolled. Every time a rule is modified the EULA may need to be updated, which means you must be in the loop with legal or IT about policy change. 

Penn State MacAdmins 2015


Penn State MacAdmins conference was last week. Over 600+ MacAdmins traveled from all over the world to discuss and share knowledge regarding OS X. This was my first year at PSU MacAdmins so I did not know what to expect. With that said I found this conference to very informative and collaborative. 

The first day there were five workshop's for attendees to choose from:

  • Apple Workshop
  • Fundamentals of Wi-Fi(or, Arguing with Physics)
  • Packaging Workshop
  • All Things Security
  • Introduction to Cocoa Development and Reverse Engineering on OS X

All great workshops but I choose the Packaging Workshop. This was of particular interest to me because I did not know how an installer should actually look and behave. This workshop explained did a great job of explaining how packages should look and behave. In addition to this information there were helpful tips with hands on packaging experience in the GUI and on the command line. The workshop had some of the following topics and suggested a few applications: 

There was also scripting and Stupid packaging tricks recommendations. This was by far one of the most helpful sessions for me all conference. I did not have a strong background with this particular topic but after this workshop I feel more than confident in my ability to exam and build proper applications packages for deployment. 

There were a plethora of amazing sessions all week long. Check out the schedule http://psumac2015.sched.org. Some of my favorites were:

  • Integrating AutoPKG and the Casper Suite with the JSSImporter
  • To 12,00 Macs and beyond....
  • Administering Office 2016 for Mac
  • It's Dangerous to Go Alone, Take This!
  • Automated Testing with VMware Fusion
  • The 12 Unix Commands Everyone Should Know
  • OS X Operating System Security at Scale
  • Using AutoPKG for Windows Software
  • Open (and/or Free) vs Closed Source - Steel Cage Death Match
  • Using Google's Open Source Tools to Manage Macs

The list is too long to list all the other sessions that I enjoyed because I could not attend them all. But something interesting occurred during this conference, crowd sourcing notes with Google Docs. I have always wondered why more people are not using crowd sourcing note taking.  It could allow you to be in multiple places at once or the ability to review the notes at the end of the day. Slack was the primary driver when organizing notes for most of the sessions and EVERYONE seemed to be on board with the idea. Many times before a session would be begin someone would place a link to the notes in #PSUMAC slack channel to allow note collaboration. 

Slides and video's will be released at a later on PSU Mac Admins website and on youtube but for those who people want to immediately review this was the perfect medium. Slack brought people who weren't even at the conference into the conversation adding input regarding topics or peering into the notes, causing further interest about all of the talks and topics. Here is a Google Docs Collection links from the notes taken by everyone at PSU Mac Admins 2015:

One particular theme that I heard constantly whether in the packaging workshop, sessions or during general conversations at Legends, automation is key. There are plenty of tools that can help you automate very simple and complex task during your day. If you have not heard of autopkg, please go and read the github page.. It interfaces with many of the tools you use everyday, and will take the mundane task of patching & deploying applications out of your hands. Automate your VMs with vfuse by Joseph Chilcote or with Rich Trouton's session on virtualization testing. The theme was your time is precious as a Mac admin, therefore save time where you can which will free your mind to accomplish more challenging tasks. 

I do want to give a thank you to Penn State Mac Admins Conference, Penn Stater, and for all the individuals who attended or interacted with community during the conference. I can't wait for PSU Mac Admins 2016! See you then and thank you again for the best week of Summer Camp. 

Freeradius and OTP

People often wonder how they can harden their OS X environment. There are many methods and tools that can be used to harden a system. Most admins live and die by SSH; however, for those who are not seasoned with SSH it can be a daunting task.

To help protect weak passwords you can set up your OS X infrastructure to use One Time Password (OTP). Here is a the internet standard surrounding OTP. Depending on your environment the prerequisites for setting up OTP on a machine may vary, but you will need these at minimum:

  • OTP Server
  • Auth Module
  • OS X System
  • Static Address
  • Shared Secret

I actually utilize FreeRADIUS pam auth module, version 1.3.17, in this write up. Version 1.3.17 has some bugs, thus the reason I had to write up how I was able to utilize the buggy version. FreeRADIUS has released version 1.4, which is suppose to address the problems in 1.3.17. For those who have not updated or seen 1.4 you can use this write up to get the 1.3.17 module working. 

The first thing to do is download version 1.3.17 from https://github.com/FreeRADIUS/pam_radius. Then, unzip the file and move the folder onto your Desktop. Before you run the Make command, there are some edits that need to be made to Makefile and the pam_radius_auth.c file. If you try to compile without making the edits then this error will occur:

" pam_radius_auth.c:358:23: error: variable has incomplete type 'struct timezone’:

      struct timezone tz;

To counter this error you must change line 358:23 you must add in the follow lines above the struct timeval tv;

struct timeval {
 time_t tv_sec;
 suseconds_t tv_usec;
 };
struct timezone {
 int tz_minuteswest;
 int tz_dsttime;
 };

It should look like the following screenshot:

After this edit your code should be able to compile however what I found if you system is considered newer you will need run a different GCC command in order to compile correctly. The error you receive when running the make command without making a change to the Makefile is:

ld -Bshareable pam_radius_auth.o md5.o -lpam -o pam_radius_auth.so

In order to combat this you must edit the Makefile. Within the Makefile there is a section called Build Shared Library. Inside of Build Shared Library it states “On systems with a newer GCC, you will need to do:" gcc -shared pam_radius_auth.o md5.o -lpam -lc -o pam_radius_auth.so". You will want to uncomment out the code for gcc.

Next copy gcc line and run it in your terminal but with a -v flag at the end:

gcc -shared pam_radius_auth.o md5.o -lpam -lc -o pam_radius_auth.so

The output of the command should look like the following:

Applications/Xcode.app/Contents/Developer/Toolchains/XcodeDefault.xctoolchain/usr/bin/ld" -demangle -dynamic -dylib -arch x86_64 -macosx_version_min 10.10.0 -syslibroot /Applications/Xcode.app/Contents/Developer/Platforms/MacOSX.platform/Developer/SDKs/MacOSX10.10.sdk -o pam_radius_auth.so pam_radius_auth.o md5.o -lpam -lc -lSystem /Applications/Xcode.app/Contents/Developer/Toolchains/XcodeDefault.xctoolchain/usr/bin/../lib/clang/6.0/lib/darwin/libclang_rt.osx.a

ou will need to copy this section of code and enter it into your terminal. Once it completes, run the make command, which should result in a correct compile.

After these steps you will now have a complete and function pam_radius_auth.so. Half of OTP setup is now is complete.

Next, you will need to edit the proper configuration files, move the pam_radius_auth.so into the proper location, and test.

Configuration Files Editing

Navigate to /etc/sshd_config. Only lines that need to be edited inside of the file are the following:

Some lines maybe yes or no, you want to ensure they look like the previous image. 

After that you will need to move pam_radius_auth.so file into its correct place "/usr/lib/pam". Next navigate to “/etc” and create pam_radius.conf file or utilize one with the pam_radius.conf that was located in the zipped pam_radius folder on your desktop. Inside of the .conf file you will be specifiy the information about your OTP server. The information you will need to procure from your identity management or cyber team are:

  • server
  • shared_secret
  • timeout

Here is an example of the file. I would leave your localhost there, as the conf file indicates and add your infrastructure below the localhost.

Next you will need to edit the "/etc/pam.d/sshd". This file will tell your system where to find your pam_radius.conf. It also dictates which .so files to use for pam authorization. A non edited conf file will have nothing commented out. You will need to add in the line 5 into your file.

Using free radius, my file looks like the following:

Once you have all these items in place I would reboot the system and test OTP to ensure authentication is working properly. During testing, remember to have the console open on the device you are setting up OTP on in order to provide possible insight into any errors

If you have any questions please do not hesitate to comment to drop me a line info @ jasonkmiller.com or jason @ jasonkmiller.co

Pf logging

In my previous post, PF for me PF for you, I went over how to utilize PF in your environment. One thing that I did not discuss was logging with PF. When PF is enabled, it does not log any of the pass in or blocks for the system. You can obtain the statistics on how well your firewall rules are performing by utilizing the following command:

pfctl -s info

Here is an example of the output:


Output of pfctl -s info. Giving you a listing of how effective is your firewall ruleset. 

But, let's say you wanted to collect more data to output to your log aggregator or just to the internal syslog to investigate;  how would you set this up?  Essentially, we want to create a text file  of traffic, things we block, or things we allow in - otherwise, we are flying blind. There are a few steps to set up logging on the system. (I have included the steps for set up on my Github as well.)

First, enable the syslogging of local2:

echo -e "# gather PF log data\nlocal2.*\t\t\t/private/var/log/pf.log" >> /etc/syslog.conf

Next, create the actual log file and change the permissions on the file:

touch /private/var/log/pf.log
chmod 640 /private/var/log/pf.log 
chown root:wheel /private/var/log/pf.log
killall -HUP syslogd

Next, set up a tcpdump from /dev/pflog0 to syslog:

cat >/usr/local/bin/pflog.sh <<END
#!/bin/sh
/sbin/ifconfig pflog0 create
/usr/sbin/tcpdump -lnettti pflog0 | /usr/bin/logger -t pf -p    local2.info
END

Then, change permissions on the the tcpdump logging:

chown root:wheel /usr/local/bin/pflog.sh
chmod 555 /usr/local/bin/pflog.sh

Next, create a launch daemon that will ensure pf is started at boot and is running:

cat >/Library/LaunchDaemons/name of.plist <

<key>Label</key>                <string>pflog</string>        <key>ProgramArguments</key>
            <array>
                    <string>/usr/local/bin/pflog.sh</string>
            </array>
    <key>Disabled</key>             <false/>
    <key>RunAtLoad</key>            <true/>
    <key>KeepAlive</key>            <true/>

END

Change Permissions:

chown root:wheel /Library/LaunchDaemons/nameof.plist
chmod 444 /Library/LaunchDaemons/nameof.plist

Finally, this step switches the pfctl launch Daemon to start fully rather than enabled on demand.  Add in the -e option into the ProgramArguments array inside of /System/Library/LaunchDaemons/com.apple.pfctl.plist
 

<key>ProgramArguments</key>

 <array>
    <string>pfctl</string>
    <string>-ef</string>
    <string>/etc/pf.conf</string>

Once all of this is in place then check to see if pf is running:

launchctl list | grep pf

Load the pf log plist:

launchctl load -w /Library/LaunchDaemons/nameof.plist

Then, check to ensure that pf log is now running:

launchctl list | grep pf

I Survived Conference Season

The last half of the year for me is conference season. Normally, I have four conferences that I attend:

They are all quite interesting and amazing in their own way. I am constantly asked, "Is it really worth your time?" I always tell people that it depends on what you are trying to accomplish by going to a conference. When I attend the conference I intend to:

  • Network

  • Discover new topics

  • Learn new methods to solve current and new problems

  • Obtain a mental refresh

During conferences I am able to do accomplish a lot of things including meeting some of the brightest people in the industry, meeting people who encounter the same issues as me and learning about new software or hardware. Attending these conferences also allows me to recharge my batteries and gain different insight. People can develop lifelong friendships and career opportunities while attending a conference.

If you are unable to attend any of these conferences the hosts usually posts videos via Youtube. You can spend a day or two watching the videos and obtain a lot of the same information.

YouTube Channels:

However, not all conferences allow their content to be posted. Mactech and Defcon do not post their sessions on YouTube but, you can order the sessions from MacTech and torrent the Defcon sessions and presentations. Another great resource tech's can utilize are other technicians blogs. Many times there will be a few wrap up posts on tech's blogs that will detail the conference experience. Which conferences did you attend? Did you find them worthwhile?

Here are some images from some of the conferences I attended this year. 


Hackathon

User communities are really important to me. It is like a tight nit village of people who want to see one another succeed and are willing to help whoever comes into village. Macbrained had a community event called a Hackathon. We tasked people to create a tool that the community will benefit from and is open source. There were some amazing entries into the competition. The group that won were the members from the Linde Group. They created a tool called autopkgr, which is a GUI application for autopkg. For those who don't like the terminal or scripting, autopkgr has nice automation tools built-in, that can make the life of a sysadmin a bit easier. It was a great event at Square Up who have an amazing space in downtown San Francisco. I again recommend user groups for those trying to get into the field because there are plenty of people who are willing to teach. Which user groups do you belong to?

The Linde Group &amp; Autopkgr

The Linde Group & Autopkgr

The Travel Guys &amp; Radar

The Travel Guys & Radar

Midnight Marauders &amp; IT Health Manager&nbsp;

Midnight Marauders & IT Health Manager 

#In the beginning there was code

I have been using Apple computers since the Apple II. I remember playing a game called Stellar 7 on my mac. I had no idea what an Apple computer was or what were it's capabilities. All I knew is my dad bought one and said we this is our new computer. My dad was a security guru during this time so I just assumed this was great tool for him to work with and a great toy for me.

Fast forward quite a bit and I find myself using a Mac for my daily computing while maintain hundreds of Apple systems for my job. Being a sys admin can be fun, challenging and irritating all at the same time. As a new sys admin I do find myself lost at times with system maintenance or troubleshooting certain problems. One of my best friends during some of the troubling times has been the terminal. Another best friend has been the World Wide Web, naming Google's search engine. There are plenty of Windows Admins out there but they out number the Mac Admins. Well I'm here to let all the beginner admins know you are not alone in your journey to be a Mac sysadmin. There are plenty of resources out there to help in your day to day activities. In addition to the day to day help resources there are people and tools that will help you succeed in the future. Here are some resources that I utilize in my journey to master my craft of being a Mac Sys Admin.

Books: 

Reading takes time, effort, and energy but it is one of the best ways to gain knowledge about a particular subject. I am a huge advocate of picking up a book/ebook and reading it for general knowledge on a subject. While reading I use Evernote to take notes digitally. This method allows me to access my notes no matter where I am, which helps when you need a reminder about a particular topic.

Two books that I have relied on in my earlier years of learning Unix/Linux as well as Unix shell scripting are:

User groups: 

Macbrained.org is a bay area OSX and iOS user community

Macbrained.org is a bay area OSX and iOS user community

User groups are your best friend. This gives you a chance to network with people of from all skillsets and backgrounds. This is also an opportunity for you to learn and ask questions to solve some of your problems. You will also find that you knowledge base is larger than you think. You may end up solving someone's problem without even realizing it. It will also provide an outlet to ask questions via a forum or blog for the group. This will help solve or answer some of your day to day inquiries. The user group that I spend the most time with is an organization called Macbrained. It is an amazing collection of individuals who just want to help make peoples lives easier.

Twitter:

Twitter's micro blogging site is full of information if you use the search feature. During this search you may find a user to follow who has useful information. People post answers to problems, research, and lots of information on twitter. These links usually point back to their website or blog which you can use as another source of information in helping you advance your skills.


In my journey to becoming a better sys admin I put the pressure on myself to take the time to seek out the proper resources and education. One thing I have learned in the last two years about technology is that you must educate yourself. If you do not own your education you will get left behind. Technology changes so rapidly that we as techs must take ownership of mastering our craft. You own your destiny, so make sure you set yourself up for success.